Two cribs, a changing table, a glider and one door that has to swing open quietly at 3 a.m. That is the puzzle in a twin nursery, and it is easier to solve on paper than with furniture already in the room. This is a seven-step twin nursery layout checklist you can finish with a tape measure and a pencil, and it is researched, not personally tested: it is a planning method, and every number comes from your own room and your own furniture listings.
Table of Contents
Step 1: Measure the Room Before You Pick Any Furniture
Write down the floor length and width, the door and closet positions, the window and vent positions, and the outlet locations. Then add the footprint of each piece you already own or plan to buy. Use the dimensions printed on each manufacturer’s product page, not a retailer’s summary, and write down whether the number is the assembled size.
| What to measure | Why it matters | Your number |
|---|---|---|
| Room length and width (ft) | Sets the budget for every other step | ______ |
| Each crib footprint (in) | Two cribs are the biggest fixed cost of floor space | ______ |
| Changing table footprint (in) | Decides which wall it can sit against | ______ |
| Door width and swing (in) | Controls the clear path in the dark | ______ |
Keep the sketch on graph paper or in a notes app so you can move pieces around. Most twin nursery layout problems show up in this step: furniture that looks fine alone but blocks something once everything else is added. Print your sketch twice, one copy for the room and one for the shopping list.
Step 2: Mark the Door Swing and the 3 a.m. Path
Draw the door’s swing arc on your sketch first. Nothing should sit in that arc. Then draw the shortest line from the door to each crib and mark it as the path you will walk half asleep. If a piece of furniture crosses that line, move the furniture, not the path.
Step 3: Place the Two Cribs Away From Windows and Cords
Choose crib spots that keep both cribs away from window cords, blind pulls and loose cables. Check where the cords actually hang and whether the curtain or blind can be swapped for a cordless one. Set up each crib exactly as its manufacturer’s instructions say, because assembly and placement rules are different for each model. The U.S. Consumer Product Safety Commission’s window covering cords page explains why cordless coverings are the safest option and advises moving cribs away from windows and cords.
This is general planning information, not medical or safety advice. For sleep set-up, follow the instructions from each crib’s manufacturer and ask your pediatrician.
Leave a gap between the cribs and the wall that you can reach into from at least one side of each crib. If the room is too narrow for that, a corner layout can solve it, as long as you can still lift a baby out of each crib without climbing past furniture.
Step 4: Put the Changing Station Within One Step of Both Cribs
Your changing station will see more traffic than anything else in the room. Put it where you can reach both cribs with one or two steps, and keep the diapers, wipes and spare clothes at arm’s reach so you never turn away from the baby. We compared four caddy options for exactly this job in our diaper caddy for a changing table guide.
Step 5: Leave a Spot for the Glider and a Lamp
Feeding twins usually means two sets of burp cloths, bottles or pillows within reach of one chair. Reserve a spot for the glider that keeps its rocking space clear of the crib and the door swing, and add a low-light lamp or a plug-in night light on the same side so you aren’t switching on the overhead light.
Step 6: Decide Where the Monitors and Storage Go
Monitors need a clear view and a power outlet, and storage needs a wall, not the middle of the room. If you’re still choosing between formats, our video baby monitor vs audio baby monitor guide and our split-screen monitor for twins post explain what each setup needs. Keep wall storage above reach of any crib, and keep cords of any device out of the crib area.
For sleep gear that suits a shared room, our Love to Dream and HALO swaddle comparison covers what we found with newborn twins.
Step 7: Walk the Layout With a Tape Measure Before Anything Is Assembled
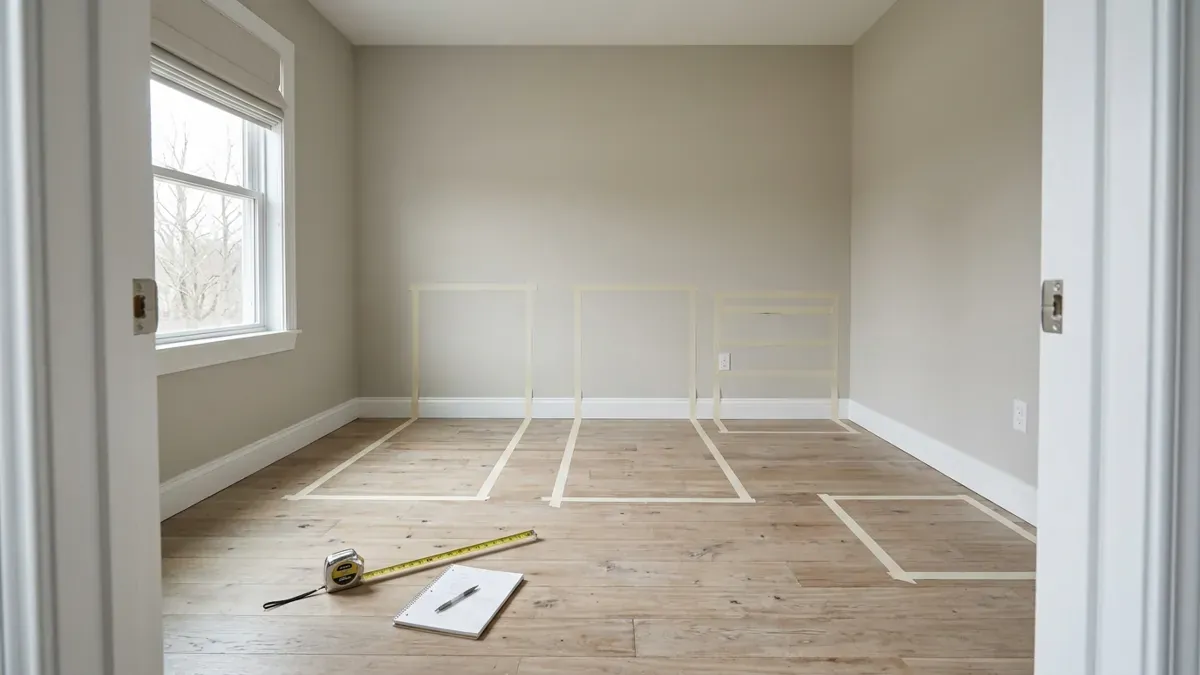
Before you commit to a twin nursery layout, mark each piece on the floor with painter’s tape at its real footprint, then walk the night path from the door to each crib with your arms full. If you bump anything, shift the layout on the floor, not after assembly. This takes about ten minutes and saves moving heavy furniture later.
When the tape outline works, photograph it and keep the picture with your receipts. If a delivered crib or table turns out larger than its listing, you will know quickly whether the layout still works, and whether the return window is worth using.
Twin Nursery Layouts for a Small Room, a Long Narrow Room, and a Room With Two Doors
The seven steps work in any twin nursery, but the best answer changes with the room’s shape. These three shapes change the plan most often.
A small room. When the floor is tight, the two cribs usually go side by side along the longest wall, and everything else fits in what’s left. That keeps one open strip for the night path, but you reach over a crib rail to get to the second one. The alternative is an L shape, with one crib on the long wall and one on the short wall. It gives each crib a side you can stand beside, at the cost of a blocked corner. Tape both versions on the floor and walk each before you choose.
A long, narrow room. A narrow room favors a single line: both cribs on one long wall, the changing table and glider on the opposite side, and the path down the middle. The catch is the door. If it opens toward the cribs’ side, the swing arc from Step 2 can take over a crib’s spot, so check which end of the room the door sits on before you commit to a wall.
A room with two doors. A closet or a connecting bathroom door adds a second swing arc and a second area to keep clear. Mark both arcs, then decide which door you’ll actually use at night. Keeping the other one closed and unobstructed is often easier than trying to keep both paths open.
None of these is a recommendation for a specific room. They show how the same seven steps lead to different answers, so use them to sort out which of your own constraints comes first.
Where Each Piece Goes: A Placement Table
Use this table as a quick check once your tape outlines are on the floor. It has no sizes because every product lists its own, so fill in the numbers from each manufacturer’s page.
| Piece | Best wall | Keep clear | Check first |
|---|---|---|---|
| Crib | A wall away from windows and cords | The door swing and the night path | Assembled size on the manufacturer’s page |
| Changing table | A wall within one or two steps of both cribs | Room to stand and reach both cribs | Whether the shelf holds the supplies you plan to keep |
| Glider | Beside the cribs, away from the window | Rocking space and the door arc | Whether it still rocks with the cribs in place |
| Storage | Any wall with free floor | The path to each crib | Whether it is stable or needs anchoring per its instructions |
| Monitor | A spot with a clear view and an outlet | The crib area, for cords | Where the cord will run |
If a row has no good wall, that piece is the one to move or leave out, not the path.
What to Buy First and What to Borrow
The layout tells you what to buy first. Pieces whose size sets the plan come before pieces that only fill gaps.
Buy first: the two cribs and the changing table or its replacement, because their footprints decide everything else. Confirm each assembled size on the manufacturer’s page, not a retailer’s summary, and keep the return window in mind until you’ve walked the tape outlines.
Buy second: the glider or chair, storage and lamps. They’re easier to fit around a finished layout than to plan around, and a chair you already own may do the job if its rocking space fits.
Borrow or defer: anything that sits on a wall or a shelf, such as a caddy or a hanging organizer, until you see how the room works in use. Our diaper caddy guide shows how much shelf room the common options take.
Twin Nursery Layout Questions Parents Ask
Do twins need separate cribs in the same room?
That depends on the cribs’ manufacturer instructions, your pediatrician’s advice and your own situation. This post covers floor space, not sleep guidance, so use it only to plan the room.
What if the room is too small for two cribs and a changing table?
Put the changing table in another room, or use a wall-mounted shelf and a caddy instead of a full table. Our caddy comparison shows the compact options.
Should the glider go next to the door?
Only if the door swing stays clear. It’s better beside the cribs, on the side away from the window.
How much floor space should I leave?
We couldn’t find a standard number that fits every room, so we don’t give one. Leave a path you can walk with both arms full and a door that opens without touching anything, then test it with the tape outlines from Step 7.
A Short List to Keep on Your Phone
Who it’s for: Parents expecting twins who want a floor plan before furniture arrives.
Who should skip: Anyone looking for medical or sleep-safety rules, which belong with the crib manufacturer and your pediatrician.
Where to buy: Painter’s tape and a tape measure from any hardware store. Check the current listing of each piece of furniture for its assembled size.
Alternative: A smaller layout that moves the changing station to another room or a wall shelf, which frees floor space for the cribs and the night path.
This post may contain affiliate links. If you purchase through one of these links, we may earn a small commission at no extra cost to you.
By The 4 Kids Dad · Updated October 5, 2026. Parent of 4 kids, including newborn twins.
Leave a Reply